The Smallfoot Toolkit gives you the ability to deliver an application solution for standalone, distributed processing devices (such as Point of Sale Terminals, hand-held devices, communications equipment, etc.) that runs on a customized version of the UnixWare operating system.
The toolkit provides the tools and environment necessary to specify the operating system and application components to be combined into a single system image that can be installed using a variety of installation methods (network install, bootable CD, etc.).
The build machine where the toolkit is installed should have a large amount of disk space for all the images being built and temporary working space. It is highly recommended to use it as a dedicated Smallfoot build machine. The host system must be running UnixWare 7.1.3 with Update Pack 3 (uw713up3) installed, along with the following packages from Update Pack 3:
glib, gtk, libIDL, mozilla -- Mozilla browser and support packages.
j2jre131 -- the Java2 1.3.1 runtime environment; only required if you need this release of Java for your application. The install script on the Smallfoot Toolkit CD installs Java2 1.4.2 by default.
Additional software necessary to support the toolkit and to build the sample projects is provided on the Smallfoot Toolkit CD. See Installing the Smallfoot Toolkit CD.
The minimal memory requirement on the target machine for the smallest non-graphical configurations is 64MB. The minimum for a configuration with X and Mozilla or Java is 256MB. For both Mozilla and Java in the same configuration 512MB of RAM is required.
To install the configurations on a hard disk (or IDE flash card), the minimal requirement is 16MB. A configuration with X, Mozilla, and Java would require at least 200MB. The hard disk can be local or remote (via NFS). More disk space is required for additional X applications.
To boot the target system through the network, the system's network card must support PXE 2.1 and have a recent PXE BIOS installed. There are known problems with older Intel Pro/100 cards that prevent them from booting through the network; a BIOS update must be downloaded from the Intel web site before these cards will boot from the network.
Most of the sample configurations use network boot because it's the easiest and fastest way to build and boot the images. We highly recommend using the network boot for experimentation. But if the network boot is not available, these sample configurations can be easily converted to CD boot. See the description in the sample configuration xcd (/opt/smallfoot/cfg/xcd/projcfg) as compared to xnet (/opt/smallfoot/cfg/xnet/projcfg).
The Smallfoot Toolkit CD contains the following package images, installed automatically by the install script:
The following directories on the Smallfoot CD contain optional software for use with the Toolkit. They are not installed by the install script. See the files in each directory on the CD for installation instructions.
cp * /tmp
udisetup usbd.udi
udisetup -m udiMsgio.udi
udisetup udi_sgio.udi
udisetup usbsgelo.udi
The touchscreen device will be /dev/usbelo0. It can be configured in XF86Config as:
Section "InputDevice"
  Identifier  "Mouse1"
  Driver      "elousb"
  Option      "SendCoreEvents" "true"
  Option      "Device" "/dev/usbelo0"
EndSection
The toolkit is also able to create this configuration in the built images automatically, however there are no sample configurations provided yet that correctly load the UDI and USB subsystems.
The install script loads the packages contained on the Smallfoot Toolkit CD-ROM. To install:
Install all required software on the Host system from the section System Requirements.
Note: javaxcomm gets installed on top of whatever Java version happens to be symlinked with /usr/java. To have both Java 1.3.1 and 1.4.2 installed with JavaX.comm, install the j2jre131 package now. The install script determines whether j2jre131 is installed, and if so installs javaxcomm, then j2jre142, and then javaxcomm again. This installs javaxcomm on top of both Java releases.
Installing Java requires at least 50MB of free space available in /var/tmp. If you have less, edit /etc/vfstab, go to the line for /var/tmp, and increase the value of swapmax to 81943040. Then, enter:
# umount /var/tmp
# mount /var/tmp
To begin installing the Toolkit, insert the Smallfoot Toolkit CD into the primary CD drive and enter:
# mount /dev/cdrom/cdrom1 /install
# cd /install
# ./install
The script installs the packages smallfoot, cdrtools, j2jre142, javaxcomm, sfdoc, and xfree86.
You can check the status of the packages after installation using this command:
pkginfo -l smallfoot cdrtools j2jre142 javaxcomm sfdoc xfree86 | pg
See Contents of the Smallfoot Toolkit CD for the other optional software available on the Smallfoot Toolkit CD.
See Smallfoot Toolkit Quick Start for an overview of the netbootmin and xcd sample projects.
All the sample projects are summarized in their projcfg files. Select a project from the table below to view the /opt/smallfoot/cfg/project-name/projcfg file for that project.
| dinstcd | dinstnet | dskmemfs | netbootmin |
| ref | test1 | xcd | xjavanet |
| xmoznet | xnet | xprobenet | xsrvnet |
To see the toolkit work, try building the netbootmin or xcd sample projects. These are buildable with little or no modifications, and build a minimal system for either network or CD install, respectively.
You may want to experiment with the configuration files to build different variations.
In particular, uncommenting the *_USR_*
settings in
/opt/smallfoot/cfg/netbootmin/mount.ecfg will allow to auto-mount /usr from a server
by NFS (of course, it must be exported from the server first, and
the correct server name must be put into mount.ecfg settings),
and will give the first approximation to an NFS-mounted root.
(The X server still won't run from there, more drivers need to be
added to the kernel than are included in this sample project).
Note that to install a netbootmin image, you need to setup your target system's network card for network install, and set up the files on a network server. The README file that accompanies the target image explains how to do this.
Unpredictable interactions between the different models of CD burners, CD drives, CD disk themselves and the BIOS on the machines booting from CD have been observed. A particularly unlucky combination may take over 5 minutes to load the kernel and memfs root filesystem from CD.
DHCP is disabled by default in this configuration, to allow quick booting on machines without a network connection.
Also this configuration demonstrates the idea of a "collection mount" (see /opt/smallfoot/cfg/xcd/memfs.pcfg for explanations).
The fonts are included only as examples of various ways to include them.
After building and installing one of these images, refer to the sections below for an explanation of the various pieces of the toolkit. The configuration files used by the netbootmin and xcd sample projects are used as examples in the section Engine and Packer Overview.
Note that you do not need to be logged in as root to use the Toolkit.
To build and test install the netbootmin sample project:
We recommend that you set an alternate project configuration directory, by copying /opt/smallfoot/sfcfg/smallfoot.cfg to $HOME/.smallfoot.cfg and changing the value of SFPROJCFDIR as shown below:
SFPROJCFDIR=$HOME/myprojectdir
$HOME/myprojectdir is the name of the directory where you can copy the sample engine and packer
configuration files you will modify for your project.
Copy all the files in the directory /opt/smallfoot/cfg/netbootmin to this location and edit them, as indicated below -- you must change at least kernel.ecfg and net.ecfg to build and successfully install this image:
| drop.ecfg | add your own applications to be picked up from the host system; these must must be copied to the Repository (/opt/sfrepo) |
| kernel.ecfg | change the HBA type; add/remove network drivers |
| mount.ecfg | uncomment the /usr NFS mount point and edit the name of the server from which it's mounted (don't forget to export it from the server as well) to get an NFS-mounted /usr |
| net.ecfg | supply the /etc/hosts table (or configure DNS and advertise in in the DHCP server) |
Enter:
/opt/smallfoot/bin/sflh netbootmin 2>&1 | tee /tmp/log
The resulting system image is placed under /opt/sfproj/netbootmin/res/memfs. See the README file in that directory for installation instructions for this image.
To build and test install the xcd sample project:
Make sure you installed the xfree86 package from the Toolkit CD (see Installing the Smallfoot Toolkit CD):
pkginfo -l xfree86
We recommend that you set an alternate project configuration directory, by copying /opt/smallfoot/sfcfg/smallfoot.cfg to $HOME/.smallfoot.cfg and changing the value of SFPROJCFDIR as shown below:
SFPROJCFDIR=$HOME/myprojectdir
$HOME/myprojectdir is the name of the directory where you can copy the sample engine and packer
configuration files you will modify for your project.
Copy all the files in the directory /opt/smallfoot/cfg/xcd to this location and edit them, as indicated below -- you must change kernel.ecfg, net.ecfg, and x86.ecfg to build and successfully install this image:
| drop.ecfg | add your own applications to be picked up from the host system; these must be copied to the Repository (/opt/sfrepo) |
| kernel.ecfg | change the HBA type; add/remove network drivers |
| mount.ecfg | uncomment the /usr NFS mount point and edit the name of the server from which it's mounted (don't forget to export it from the server as well) to get an NFS-mounted /usr |
| net.ecfg | supply the /etc/hosts table (or configure DNS and advertise in in the DHCP server) |
| xf86.ecfg | correct videocard driver module (e_XS_VIDEO), list of hosts from which the applications may run (e_XS_HOSTS) |
| xf86.ecfg | change video modes, add or remove applications, configure a different secondary mouse, other fonts, what applications to start |
| xsco.ecfg | add or remove applications |
Enter:
/opt/smallfoot/bin/sflh xcd 2>&1 | tee /tmp/log
The resulting system image is placed under /opt/sfproj/xcd/res/memfs. See the README file in that directory for installation instructions for this image.
Assess the software requirements of the target system hardware. Determine the drivers, executables, devices, file system types, boot method and other information required by the configuration files. See the section Engine and Packer Overview and browse the configuration files to get an idea of the information required by each engine's configuration files.
Choose a sample project that is closest to your system requirements, and copy that project's configuration files before editing them. See Overview of Smallfoot Sample Projects and The smallfoot.cfg File.
Edit the configuration files for your target system, according to the information obtained in Step 1. See the configuration files for the ref sample project for descriptions of all the available configuration options, as well as the comments in the configuration files for the sample project you chose in the previous step.
Load software for the target system image onto the Smallfoot Development System, either by installing it directly onto the system, or copying it manually into directories under /opt/sfrepo. See Host System Image and Repository.
Build the target system image using the sflh command. See Using the sflh Command.
Configure a network boot server, or burn a CD, with the bootable target system image, as necessary. Install the image on the target hardware. See The Bootable or Installable System Image.
See Smallfoot Toolkit Structure and Concepts for an illustration of the Smallfoot Toolkit design.
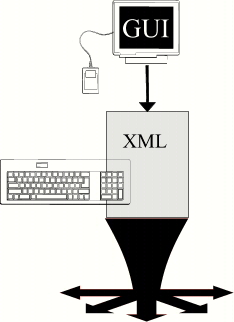
The following figure shows the various pieces of the Smallfoot Toolkit, and the general flow of the interface to the various pieces. Note that in the beta version of the toolkit, the top-level GUI and Text file interfaces are not provided. They will be provided in a future release of the toolkit.
Click on the links in the figure to learn more about the Smallfoot Toolkit components.
| In the Beta version of the toolkit, it is necessary to manually configure each engine for your project's needs (see the table below). Sample projects are provided from which you can copy and modify these files to get you started. (A high-level GUI and text file interface to the Smallfoot configuration files will be provided in later versions.) | |
To build a custom system using the toolkit, you define a group of configuration files as input to the toolkit's "engines". Each engine's configuration file specifies a portion of the final system image. A special engine called a "packer" performs the packaging of the final image into the installable or bootable image desired. |
 | |
 |
 Target System |
The heart of the toolkit from the user perspective is the set of configuration files for the engines and packer used to generate the final system image. There are 22 engines and 1 packer provided by the current toolkit, each with its own configuration file.
The purpose of segmenting the work done to build a system image into engines is to provide the flexibility needed for easy adaptation of the toolkit to fit a variety of configuration requirements.
In the sections below, we explain each of the engines and compare the sample configuration files for that engine in the netbootmin and xcd sample projects. Note that sample project configuration files are kept in project directories under /opt/smallfoot/cfg, as in /opt/smallfoot/cfg/xcd.
The ref project is a special project that contains the most extensive and comprehensive commentary in each configuration file.
We reommend that when creating your own versions of these sample projects, you first copy the existing files to another directory before modifying them. See The smallfoot.cfg File.
For a detailed description of engine design, see Engine Internals. See the section Overview of Smallfoot Sample Projects for descriptions of all the sample projects.
The bin engine collects the files from the /usr/bin, /usr/lib, /etc, /sbin, and /usr/sbin directories, based on the criteria and settings in the /opt/sfproj/project-name/bin.ecfg configuration file. Each sample project listed in the table below provides an example version of the bin.ecfg file; click on the project name to see that project's bin.ecfg file. Explanations for most parameters appear in the files.
| dinstcd | dinstnet | dskmemfs | netbootmin |
| ref | test1 | xcd | xjavanet |
| xmoznet | xnet | xprobenet | xsrvnet |
The figure below shows the differences between the netbootmin and xcd sample project bin.ecfg files:
| netbootmin bin.ecfg | xcd bin.ecfg |
|---|---|
e_ESCSI_FILE_tc_index=Y |
e_ESCSI_ALL=Y e_ESCSIFORMAT_ALL=Y e_ESCSIMKDEV_ALL=Y e_ESCSITARGET_ALL=Y e_BIN_FILE_tftp=Y e_BIN_FILE_telnet=Y e_BIN_FILE_rlogin=Y e_EFSCDFS_ALL=Y e_EFSVXFS_ALL=Y |
The directives in the xcd bin.ecfg pull a number of utilities into the image that are not necessary for the netbootmin image.
The console engine sets up the locale, keyboard, and other elements of the console environment based on the settings in the /opt/sfproj/project-name/console.ecfg configuration file. (Locale information may be split into another engine in the future; currently only the console engine uses it.) Each sample project listed in the table below provides an example version of the console.ecfg file; click on the project name to see that project's console.ecfg file. Explanations for the parameters appear in the files.
| dinstcd | dinstnet | dskmemfs | netbootmin |
| ref | test1 | xcd | xjavanet |
| xmoznet | xnet | xprobenet | xsrvnet |
The console.ecfg file for the netbootmin and xcd sample projects is the same.
The dcu engine provides only one parameter, which determines whether or not the files necessary for interactive dcu mode are included. Most configurations will not find it necessary to change the contents of this file. The console.ecfg file for the netbootmin and xcd sample projects is the same.
| dinstcd | dinstnet | dskmemfs | netbootmin |
| ref | test1 | xcd | xjavanet |
| xmoznet | xnet | xprobenet | xsrvnet |
The device engine creates the device database in the target image. It does not create device nodes under /dev; that is done by the kernel engine. The only parameter in this file controls whether the device database from the host system is copied to the target image, or whether a blank database is created. Most configurations will require only a blank database; this is the setting for both the xcd and netbootmin projects.
| dinstcd | dinstnet | dskmemfs | netbootmin |
| ref | test1 | xcd | xjavanet |
| xmoznet | xnet | xprobenet | xsrvnet |
The drop engine copies files from subdirectories under /opt/sfrepo. The only parameter in this file is a list of subdirectory names, separated by commas. The xcd and netbootmin projects do not specify any directories.
| dinstcd | dinstnet | dskmemfs | netbootmin |
| ref | test1 | xcd | xjavanet |
| xmoznet | xnet | xprobenet | xsrvnet |
The dskinst engine configures a network-installed or CD-installed target image to be able to load a hard disk from the network. It is not used by the netbootmin and xcd sample projects. See the sample dskinst.ecfg files below for explanations of the parameters in this file.
| dinstcd | dinstnet | ref |
To make a bootable hard disk drive (HDD), two configurations are neccessary: one is the image that is installed onto the HDD, and the second one is the one that installs the first image onto the HDD. Obviously, the second image must boot by some other means, such as network or CD (we provide both examples).
The inittab engine defines the /etc/inittab entries [see inittab(4)] for the target system image based on the settings in the /opt/sfproj/project-name/inittab.ecfg configuration file.
These entries are dependent on the target system configuration and the software being copied to the image.
Each sample project listed in the table below provides an example version of the inittab.ecfg file; click on the project name to see that project's inittab.ecfg file. Explanations for most parameters appear in the files.
| dinstcd | dinstnet | dskmemfs | netbootmin |
| ref | test1 | xcd | xjavanet |
| xmoznet | xnet | xprobenet | xsrvnet |
The netbootmin inittab.ecfg file includes a basic set of inittab entries. The xcd project has an additional entry for Xfree86 startup.
The following entry in the inittab.ecfg file:
e_ENTRY_0100_inittab='::sysinit:/sbin/sfoot/rc-sysinit >/dev/console 2>&1 </dev/console'
Enables you to add executables to the Repository that will be copied to the target system and run during the sysinit phase of the boot process on the target system. These are added using the drop engine mechanism, as follows:
Create directory /opt/sfrepo/user/myapp; put the application's binaries an other files into this directory; put the application's start-up script into a file named /opt/sfrepo/user/myapp/sbin/sfoot/sysinit/S2000user_myapp; in drop.ecfg add user/myapp to the list in e_DROP_REPO_DIRS, for example: e_DROP_REPO_DIRS="user/myapp" . Add files to this directory with the name format:
SnnnnID
Where nnnn is a four-digit decimal number, and ID is a unique identifier for the file. The files are executed in the number order determined by nnnn. The number nnnn for user apps must always be over 1000. The suffix ID must be either "user" or "user_further-ID", where further-ID is at user's choice as long as it consists only of letters, digits and the underscore character (_).
Scripts added in this fashion are installed under /sbin/sfoot/sysinit in the bootable image.
The rc scripts must complete; if they start any applications, the applications must be started in the background.
The second way to start an application is to put in into inittab.ecfg
as an init respawn line; then the command must not exit until the
application exits, and when this happens it will be automatically
restarted (this gives some protection against application crashes).
The line would look like:
e_ENTRY_9999_user_id=':1234:respawn:command </dev/con\sole >/dev/con\sole 2>&1'
Where id is an arbitrary user-selected ID as described above. /dev/console is the default screen visible to the user, so all appropriate applications should be started there. Make sure that no more than one application is started on each screen.
To start X applications, start them by placing the start command
into e_XINIT_RC in xf86.ecfg.
There is no canned way of automatic
restart but it can be done easily by wrapping the command into an
endless loop, like:
...
 ( while :; do app-start; sleep 3; done; ) >/var/adm/log/app.log 2>&1 &
...
The java engine specifies whether to include Java and JavaXComm in the target image. It is not used by the netbootmin and xcd sample projects. See the sample java.ecfg files below for explanations of the parameters in this file.
| ref | xjavanet |
The kernel engine copies the drivers and creates the device nodes for the target image, based on the criteria set in the file /opt/smallfoot/cfg/project-name/kernel.ecfg. Each sample project listed in the table below provides an example version of the kernel.ecfg file; click on the project name to see that project's kernel.ecfg file. Explanations for most parameters appear in the files.
| dinstcd | dinstnet | dskmemfs | netbootmin |
| ref | test1 | xcd | xjavanet |
| xmoznet | xnet | xprobenet | xsrvnet |
The xcd sample project includes a number of kernel modules not needed by the netbootmin sample project:
cdfs
connld
consem
event
ide
ipc
mse
m320
pcix
ptem
ptm
pts
sc01
segdev
smse
vxfs
xque
In addition to kernel drivers, HBA drivers are also specified here, as in this directive from the xcd kernel.ecfg:
e_DRV_ide_HBA=Y
See one of the sample kernel.ecfg files for an explanation of the syntax used to include these drivers.
The lib engine copies the contents of /usr/lib, /usr/ccs/lib, and /usr/local/lib to the target image, based on the criteria set in the file /opt/smallfoot/cfg/project-name/lib.ecfg. Each sample project listed in the table below provides an example version of the lib.ecfg file; click on the project name to see that project's lib.ecfg file. Explanations for most parameters appear in the files.
| dinstcd | dinstnet | dskmemfs | netbootmin |
| ref | test1 | xcd | xjavanet |
| xmoznet | xnet | xprobenet | xsrvnet |
The netbootmin sample project copies the basic C, runtime, and networking libraries to the target image. The xcd project adds C++ and X server libraries and tools.
The packer memfs produces bootable RAM disk, CD-ROM, and hard disk images. In the netbootmin project it produces a RAM disk image; in xcd it produces a bootable CD-ROM image. This is controlled by the following parameter:
e_BOOT_TYPE=NET|HDD|CDROM
Where NET is used for network installable images, HDD for bootable Hard disk images, and CDROM for bootable CD images. See the comments in the file /opt/smallfoot/cfg/ref/memfs.pcfg for complete parameter descriptions.
The mount engine provides definitions of the file systems to be mounted on the target image when it boots, based on the criteria set in the file /opt/smallfoot/cfg/project-name/mount.ecfg. Each sample project listed in the table below provides an example version of the mount.ecfg file; click on the project name to see that project's mount.ecfg file. Explanations for most parameters appear in the files.
| dinstcd | dinstnet | dskmemfs | netbootmin |
| ref | test1 | xcd | xjavanet |
| xmoznet | xnet | xprobenet | xsrvnet |
The mount engine creates the mount points and /etc/vfstab entries for the file systems. Mounting is done by the rc script generated automatically by the mount engine.
To work properly, there needs to be some coordination between what's specified in mount.ecfg and other configuration files:
The corresponding file system drivers must be configured by the kernel.ecfg file.
The appropriate file system binaries must be specified by the bin.ecfg file.
All file systems must be described in memfs.pcfg. It creates images of the filesystems to be mounted (except if the filesystems are not part of the image being built but are created and provided by some external sources). So if the bootable image is split into multiple filesystems, they have to be described twice (though in somewhat different aspects): once in mount.ecfg to have them mounted on boot, and once in memfs.pcfg to create the part of the image related to this filesystem as a separate part.
The mouse engine configures a mouse for the target image when it boots, based on the criteria set in the file /opt/smallfoot/cfg/project-name/mount.ecfg. Currently, only a PS2 mouse is supported. Each sample project listed in the table below provides an example version of the mouse.ecfg file; click on the project name to see that project's mouse.ecfg file. Explanations for most parameters appear in the files.
| dinstcd | dinstnet | dskmemfs | netbootmin |
| ref | test1 | xcd | xjavanet |
| xmoznet | xnet | xprobenet | xsrvnet |
The netbootmin sample project does not use this engine. The xcd project defines a PS2 mouse with 3 buttons.
Note that a serial mouse can be supported by configuring XFree86 to use the serial port directly, bypassing the generic OS mouse interface. See the xf86 Engine.
The mozilla engine sets up the locale, keyboard, and other elements of the console environment based on the settings in the /opt/sfproj/project-name/mozilla.ecfg configuration file. Each sample project listed in the table below provides an example version of the mozilla.ecfg file; click on the project name to see that project's mozilla.ecfg file. Explanations for the parameters appear in the files.
| ref | xmoznet |
To work properly, there needs to be some coordination between what's specified in mozilla.ecfg and other configuration files:
The required libraries must be configured by the xsco.ecfg file.
The base libraries must be specified by the lib.ecfg file, as well as the following:
e_CAT_mozilla=Y
The bin.ecfg file must also specify:
e_CAT_mozilla=Y
The netbootmin and xcd sample projects do not use the mozilla engine.
The net engine configures DHCP (Dynamic Host Configuration Protocol) and /etc/hosts on the target system, based on the criteria set in the file /opt/smallfoot/cfg/project-name/net.ecfg. Each sample project listed in the table below provides an example version of the net.ecfg file; click on the project name to see that project's net.ecfg file.
| dinstcd | dinstnet | dskmemfs | netbootmin |
| ref | test1 | xcd | xjavanet |
| xmoznet | xnet | xprobenet | xsrvnet |
The netbootmin project configures DHCP and several host names for the /etc/hosts file. The xcd project disables DHCP and also includes /etc/hosts entries.
This engine configures the Netscape browser for the target system image. It is currently not supported, and is not used by any of the buildable sample configurations. See /opt/smallfoot/cfg/ref/netscape.ecfg.
The nfs engine specifies whether NFS and RPC are to be copied to and started on the target system image. All the sample configurations use the same nfs.ecfg file, and include both RPC and NFS in the target images. See /opt/smallfoot/cfg/ref/nfs.ecfg.
The passwd engine simply drops the following security related files into the target system image from the host image:
/etc/passwd
/etc/group
/etc/shadow
/etc/security/ia/index
/etc/security/ia/master
/etc/security/ia/.pwd.lock
There are no user configurable parameters in passwd.ecfg; but this file still needs to be included in the project directory if the password files are to be copied to the target system image. See /opt/smallfoot/cfg/ref/passwd.ecfg.
The skel engine by default pulls everything under the /opt/sfproj/skel directory (if it
exists) into the target system image.
The single parameter in skel.ecfg, e_DROP_REPO_DIRS, specifies alternate directories
under /opt/sfproj from which to copy files to the target image.
While this is essentially the same as the drop engine, the skel engine is intended for system-level
files, drop for user applications.
All the sample projects have the same skel.ecfg file.
See /opt/smallfoot/cfg/ref/skel.ecfg.
The terminfo engine copies the terminfo and termcap entries specified in the file net.ecfg. All the non-graphical sample projects copy in the following entries:
AT386
AT386-ie
AT386-M-ie
ansi
scoansi
The graphical sample projects add xterm to the above list.
See /opt/smallfoot/cfg/ref/terminfo.ecfg.
The time engine specifies the Time Zone (TZ) for the target system. See the environ(5) manual page for the format to use to specify the time zone. See /opt/smallfoot/cfg/ref/time.ecfg. The default value for time zone is:
:US/Eastern
This engine configures the xfree86 X server for the target system image. It is only necessary for configurations that include the Xfree86 server (such as xcd; the netbootmin project does not use this engine). See the sample project files for more information:
| ref | test1 | xcd | xjavanet |
| xmoznet | xnet | xprobenet | xsrvnet |
This engine provides the files and links necessary to ensure that legacy UnixWare X binaries run properly on the target system. It is only necessary for configurations that include the Xfree86 server (such as xcd; the netbootmin project does not use this engine). See the sample project files for more information:
| ref | test1 | xcd |
| xjavanet | xmoznet | xnet |
The file /opt/smallfoot/sfcfg/smallfoot.cfg specifies system settings for the Toolkit, and is required by the sflh command. The default smallfoot.cfg has a number of parameters; see the descriptions in the file.
We recommend that you set an alternate project configuration directory, by copying /opt/smallfoot/sfcfg/smallfoot.cfg to $HOME/.smallfoot.cfg and changing the value of SFPROJCFDIR as shown below:
SFPROJCFDIR=$HOME/myprojectdir
$HOME/myprojectdir is the name of the directory where you can copy the sample engine and packer
configuration files you will modify for your project.
You must copy the entire /opt/smallfoot/sfcfg/smallfoot.cfg file; if $HOME/.smallfoot.cfg exists, then only it is read for global Smallfoot configuration parameters.
The host system on which the Smallfoot Toolkit resides is used as the source for the runtime system and libraries copied into the target system image produced by the toolkit. Most executables, libraries, drivers, etc., are copied from the host system by the engines. A third-party driver, for example, can be installed on the host system, and then added to the list in the project's kernel.ecfg file.
If desired, you can install a completely separate host machine, and copy all the
contents of its hard disk into a directory on the build machine, and specify the location of
that directory using the SFSYSIMG parameter in the
smallfoot.cfg file.
In this case, the sflh command looks to the specified directory
instead of the local host for source files to copy to the final target image.
The Repository (/opt/sfrepo) contains Smallfoot utilities and data files used to build the target system image. User data can be added to the Repository, and specified in the engine and packer configuration files for inclusion in the target system image. The exact format of what an engine expects to find in the Repository depends on the particular engine. See the comments in the various engine and packer configuration files.
The convention used for user data in the Repository is to create a subdirectory named user or user.company where company consists entirely of uppercase and lowercase letters and digits (no special characters allowed). Examples are /opt/sfrepo/user and /opt/sfrepo/user.sco. Further subdirectories can be created as needed.
NOTE: Never modify any of the directories and files supplied with the toolkit under /opt/sfrepo. If it is necessary for any reason to modify one of these files, copy the toolkit-provided files to directories under /opt/sfproj/user (for example), modify the copied files, and change the appropriate engine configuration files to pickup the modified copies.
The toolkit is intended to run by a non-root user, to reduce the chance of accidental damage to the host system. When a new project is built for the first time, sflh will ask for the root password and will remember the superuser privileges to be used when necessary.
The sflh command is typically used like this:
/opt/sfoot/bin/sflh project-name
The project-name is the name of one of the directories under /opt/sfoot/cfg; this directory must contain the configuration files for the project (see Engine and Packer Overview. For example:
/opt/sfoot/bin/sflh netbootmin 2>&1 | tee /tmp/log
Creates a minimal network bootable image from the netbootmin sample project files. The results will be placed in /opt/sfproj/project-name/res/packer-name, in the example above that would be /opt/sfproj/netbootmin/res/memfs.
The slfh command supports the following options:
sflh [-dfv] [-c config-file] [-e engine-name]... [-p packer-name]... config-name
-d- Enables very verbose output from the engine build scripts.
-f- Forces a complete rebuild; the default is to build only those engines and packers whose configuration files have changed. The
-foption should always be used to create the final production target system image.-v- Enables verbose messages.
-c config-file- Specifies an alternate /opt/smallfoot/sfcfg/smallfoot.cfg file.
-e engine-nameBuilds only the named engine; multiple -e options can be specified. The default is to build all engines that have a configuration file in the /opt/sfoot/cfg/project-name directory.
-p packer-nameBuilds only the named packers; multiple -p options can be specified. The default is to build all packers that have a configuration file in the /opt/sfoot/cfg/project-name directory.
The general process followed by sflh is as follows:
Contains a directory per project being built. The internal structure of these project directories is:
Always placed under /opt/sfproj/project-name/res/packer-name. A README file accompanies the resulting image; it contains installation instructions for the image. The format of the image is specified in the project configuration file for the memfs Packer. Also see Using the sflh Command.
Note the following:
The uname command on an installed target system returns the same values returned by the host system on which the image was built, with the exception of the system name. The system name returned by uname on the target system is set to the default: "unix".
All target system images contain a Uniprocessor (UP) kernel, even if the host system is a Multiprocessor (MP) system.
Only the telnet client is copied to the target system image by the bin engine; the telnet server is not copied to the image. Even if the telnet server is copied, it will not currently work.
Video card support/performance will vary depending on the card used.
To boot from CD, the target system BIOS must support CD boot in no-emulation mode.
© Copyright 2003 The SCO Group, Inc. All Rights Reserved.